Showing posts with label projects. Show all posts

Monday, August 4, 2014

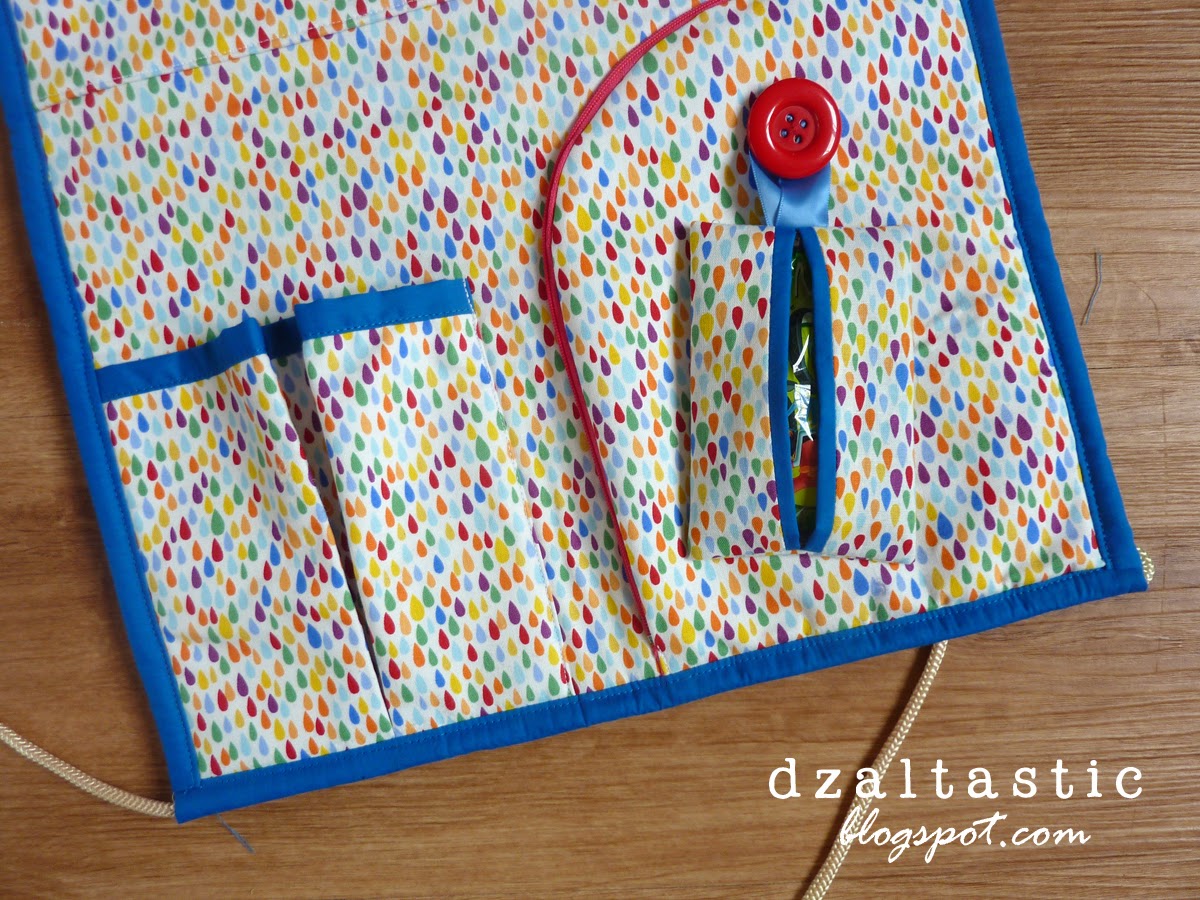
Carseat Organizer

I pretty much love a sewing challenge! Got pretty excited when a friend suggested I make her a car seat organizer. Something she could put books and some of her daughter's stuff. This took a while to plan and execute, and had to source out materials from different places, but I must say I liked the final outcome very much ;)


I don't have photos of it in action but you just strap the buckle around the neck of the front seat (facing the back seat passengers of course) and tie/fasten the rope around the lower back of the front seat.


post signature

Wednesday, April 2, 2014

Owl Tote Bag: An Artsy Crafty Babe Pattern


Finally completed this cute Owl Tote bag after its fair share of dilemma after dilemma. From finding the right lining, buying the wrong interfacing, an unserviced sewing machine and a missing interfaced piece. Hoot hoot! Well...now I just need the right button to suit it.


I altered an Artsy Crafty Babe's free Pleated Tote pattern for this tote, as I fell in love with the pleats on her little polka dotted tote! Only customization I made was the different coloured bottom part. So I cut a 3-inch high bottom piece. Would probably add 2 inches more to the bottom piece just so I could see more of it on the sides rather than the bottom. Loving the effect nonetheless!


I'd also add another inch to the hoop just so it'll be longer and my button would be better placed. After a rough estimation, the measurement provided in the pattern is a tad short for my liking and now my button would have to be higher placed, nearer to the edge.


Besides that, I over-estimated my unserviced machine's capability and realised that it couldn't really manage the heavy interfacing on both sides of the fabric AND the thick handles. Am proud of the fella for sticking through the project, albeit slowly (more like nearly dying) making its way through the thick material. Now hoping my friend would be as happy as I am with this little piece of work. 

And finally ending this entry with a photo of my little bag model helping Ibu (mummy) with the bag. Thank you baby! 


Much love,
post signature

Thursday, March 20, 2014

The Malaysian Batik Purse Clutch


Malaysian batik never seems to bore me. I think they're beautiful in their own unique way differentiating itself from the Indonesian batik and the designers' popping up now a days. So I took out my stash of Malaysian printed batik, made a purse pattern for a 7 inch zip and tada! Will add on a strap to turn it into a wrislet cause my smart phone fits nicely in it.

More colours will be added to this collection cause it just looks to pretty and vintage-y. Aidi, on the other hand, decided that the purse would work better as a remote control holder.


post signature

Tuesday, March 11, 2014

Paperlove Blog Hop: Miniature Kite Wau. Wow!


I've been a fan of paper for the longest time. Yes, paper! The colour of vibrant printed wrapping paper, the smell of old books and the sound of crinkling torn paper. I've been fascinated with it's capabilities to transform from such a simple two sided sheet to anything creatively imagined. That's why I love making printables and decided to take part in this bloghop! 

I love how they can be intricately cut, folded into 3 dimensional objects or even as mere entertainment for an inquisitive little boy.


So for my Paperlove Blog Hop, I ended up reminiscing on my past art classes in primary school and recalled one paper project that was often a hit among the students. It was kite making! And not any ordinary kite. Our traditional kite, the Malaysian kite. The Wau!

With help from my little sidekick, I decided to make a miniature Wau as a tribute to the Paperlove Blog Hop. Made out of coloured paper, glitter paper, wooden sticks, thread and some beads.


The International Kite Festival 2014 happened just recently in the country last January. Sad I couldn't make it but I heard that there were some pretty impressive kites. So this came just in time!

Photo credited to my friend's husband, Joon Ming Photography, who has some pretty impressive photos of the event

The Wau is famous for it's intricate design and size. It's known as the biggest type of kite, measuring about 3.5 meters from head to tail. Aging more than a hundred years old, Wau flying has been a favourite past time for harvesters from the rural (kampung) areas. Creative people!


It's beautiful how people from all around the world interpret the use of paper and produce something amazing out of it. There are so many types of kites, from all parts of the world, all because a thin piece of paper can carry different meaning from one person to another. Come celebrate PAPER with us through this bloghop and visit other paper lovers (below) who have blogged about their love for this one piece wonder.

Now, what about you? What have you made out of paper today? 

post signature


The PaperLove Blog Hop is a celebration of all things paper! Follow the links to discover more bloggers who love paper and use it to inspire and delight. And if you want to explore a whole world of paper, and stretch your paper passion further with a host of creative projects, why not join the innovative new online course PaperLove (starts March 31). Led by book artist Rachel Hazell, PaperLove is a five week creative adventure for paper lovers. Find out more here.

Majo Bautista / Tona Bell / Louise Best / Cathy Bluteau / Jennifer Bomgardner / Giova Brusa / Lindsay Buck / Beka Buckley / Joanna Caskie / Jonathan Chapman (Mr Yen) / Halle Cisco / Sarah Clare / Cathryn Clarge / Dawn Clarkson / Rhiannon Connelly / Jenny D'Fuego / Molly Dhiman / Ian Dudley / Ayisatu Emore / Akmal Farid / Monika Forsberg / Claire Fritz-Domeney / Louise Gale / Chrissy Gaskell / Julie Hamilton / Emma Hawman / Rachel Hazell / Holly Helgeson / Claudine Hellmuth / Kim Henkel / Sarah Hoffman / Joanne Hus / Paula Joerling / Beth Kempton / Julie Kirk / Eos Koch / Katie LaClair / Kristy Lankford / Michelle Manolov / Doreen Marts / Rosie Martinez-Dekker / Tori Mears / Maria Mederios / Lise Meijer / Debbie Miller / MaryJane Mitchell / Suzy Naidoo / Grace Noel / Hannah Nunn / Camilla Olsson / Jo Packham / Rachelle Panagarry / Monette Pangan / Melanie Paul / Nicole Piar / Jen Pitta / Liz Plummer / Julie Reed / Michelle Reynolds / Lisa Rivas / Angee Robertson / Natalie Ryan / Aisling Ryan / Elisabet Sapena / Kyrrha Sevco / Jamie Sprague / Elizabeth Steele / Terri Stephens / Juniper Stokes / Mary Tanana / Maike Thoma / Linda Tieu / Gabrielle Treanor / Tammy Tutterow / Deborah Velasquez / Jordan Vinograd Kim / Cat Whipple / Brooke Witt / Katie Wood / Amelia Woodbridge

Wednesday, March 5, 2014

How I Made the Snap Clutch Handbag Purse


I've been keeping this set of Korean Imported fabric for a while now. Ordered it directly from Korea from a friend of mine. Been waiting for the right time to use it. And it came. Yes it did! For someone extremely important in my life. (Will update more on that once I give the bag to her!)

Now, I'm no purse maker. This was my first time buying a metal snap frame and I just wasn't sure how to do it. Luckily, there's the internet and I found this wonderful tutorial at Guthrie & Ghani. I started off by making a pattern for the frame since mine measured bigger than in the tute.


The frame I bought measured about 10 inches across and I wanted it to be 6 inches deep. Normally I'd go all experimente and just cut the fabric without making a dummy, but this fabric was just too pretty to make any mistakes and I only had fat quarters of each material. So I carefully cut out my pattern using some remnant linen and once I was satisfied, cut out all the pieces for the purse. I also added some batting and interfacing to give the purse some body.


I coaxed hubs to get me some fabric/metal glue cause that was the one thing I left out. Duh! Luckily he can never say no to a trip to the hardware store. Once I got the glue, I secured the completed purse body to the metal frame. It took me a while to get use to gluing the fabric into place. Plus, the glue didn't come with a nozzle so I had to use a wooden stick to get the glue in the right place. Cloth pegs and paper clips came in real handy at certain places. The purse turned out so pretty once the glue set that now I feel like I need to make another one for myself. 


Credit goes to hubs for getting me the glue and to my little wear and tear tester. Yes, mummy makes things with her hands and you destroy them with your little ones. We make a great team baby! 


post signature

Wednesday, February 26, 2014

Cross stitch buttons + Free Pattern


Saw this tutorial on My Poppet and thought it would be so cool to cross stitch little buttons for Aidi's travel bag.

Thursday, February 20, 2014

Embroidery Project Bag Tutorial and Pattern


Weee...time for another tutorial!

I was pretty much inspired by an Instagram acquaintance @treadofhearts who made a project bag to put all her cross stitching stuff. I fell in love with the idea, made a bag with an embroidery panel to later stitch a design on and decided to share my work process. Change the measurements a bit and it can even work as an easy Ipad soft case.

Friday, February 14, 2014

DIY Cloth Blocks Tutorial


This was actually one of those mistakes-turned-great kinda projects. I wanted to make unique cube Batu Serembans (or five stones) to play with but ended up making them a little bit bigger than expected. But Aidi and I had so much fun with these that I just had to share them.

Tuesday, January 28, 2014

Cross stitching with The Frosted Pumpkin

While cleaning the house today I found my old set of cross stitch thread and found the urge to start on a cross stitch project (again!). Haha..never managed to complete my last project cause I made my own pattern from a photo of my uni friends and I lost the pattern somewhere in my hard drive. Note to self, next time, please email yourself the pattern or print a hard copy of the custom made pattern.


And it's oh so pretty too. Shame that I can't finish it now :(

Wellll..moving on. I have an image of a cute design of Elsa of Disney's Frozen in my head but will need more time to think of the design and probably share a pattern on the blog. While browsing for more ideas, I stumbled upon this cute cross stitch pattern website/shop: The Frosted Pumpkin Stitchery


Their patterns are oh too cute. Their whole concept is on creating kawaii cross stitch designs. Kawaii da ne!

I've downloaded one of their freebies on Kitschy Digital and now I just need new Aida cloth. Oh and maybe some new thread as well. Cause really, you rarely can find cute cross stitching patterns and granny designs are just too dull. I'd probably purchase their monthly sampler too. Not too late to join in on the 2014 fun on Instagram #onceuponatimesampler #thefrostedpupmkinstitchery. Been browsing the hashtags and am giddy with excitement.


Image from their Big Cartel and don't forget to read Amanda's (the co-owner's) blog too!

It's a one time purchase cross stitch pattern where they'll email a new pattern every month so you can add on the design to create a larger piece of tapestry. This'll also help motivate me to cross stitch more frequently  The theme just came at the right time too cause I've been feeling a little bit disney-ish lately, I blame watching Frozen for this (>.<)

post signature

Monday, January 27, 2014

My first time with knit fabric

Received my little pack of sewing stuff and fabric from Japan a while back. Happy happy as can be!


It's been super hard to find cute knit fabric in Malaysia, so was looking forward to get these knit fabric for the little one (If you do know of a place, please tell me and I'd forever be grateful >.<). Couldn't personally choose the fabric patterns but I asked for boyish designs from my relative who was coming back from Japan, just so I could make something for Aidi.

I was expecting a thinner type of knit, more t-shirt like, but I love the designs nonetheless. Was informed that they had cute girly designs but I still don't have a little girl to splurge my money on and part of the fun is making stuff for my baby. To be on the safe side, I only bought 1 meter of each design and my first knit project was a simple 'shorts' project.


My first impression of knit? The heavier weight of the fabric made serging (jahit tepi) easy. Yet, when the edges rolled up, I came to realise why the shape of the footer was in the shape of an L. To unravel the rolled edge causing it to travel flat under the needle.


I don't know about you but I found it much easier to serge twice. The first stitches helped bind the fabric thus no more edge rolls on the second round. Made this in about 15 minutes! Inserted the elastic band for the waist and my boy now has his own knit shorts. Ta daa! 


Hubby came home and was jealous of the little pumpkin's shorts and demanded one for him too. Well, will have to see what I can whip up next with the fabric I have left.

post signature
Related Posts Plugin for WordPress, Blogger...

Subscribe to my mailing list

To receive free printables, sewing ideas and daily updates sign up for my newsletter by entering your email address below. Thanks!


SITE DESIGN BY DESIGNER BLOGS